Have you ever wondered how to securely connect your IoT devices behind a firewall using a Mac server? Well, buckle up because we’re about to dive deep into the world of remote IoT connectivity, and trust me, it’s going to be a wild ride. In today’s tech-driven era, connecting smart devices remotely is more critical than ever. Whether you’re managing a home automation system or running an industrial IoT setup, understanding how to use RemoteIoT behind a firewall can save you tons of headaches. This guide will walk you through every step of the process, making sure you’re not just connecting but also doing it securely.
Imagine this scenario: You’re at work, and you suddenly need to check if your home’s temperature is just right. Or maybe you’re monitoring a critical piece of machinery in a remote location. The challenge? Your devices are tucked safely behind a firewall, and you’re using a Mac server. Sounds tricky, right? Don’t worry, because by the end of this article, you’ll be able to set up a secure connection like a pro.
Now, why is this important? Firewalls are designed to protect your network from unauthorized access, but they can sometimes block legitimate traffic too. That’s where RemoteIoT comes in. It’s like a secret tunnel that lets your devices communicate securely without compromising your network’s safety. So, whether you’re a tech enthusiast or a professional looking for a solution, this guide has got you covered.
Read also:David Boon Son Unveiling The Legacy And Journey Of A Cricket Icon
Understanding RemoteIoT and Its Role in IoT Connectivity
Before we jump into the nitty-gritty of setting things up, let’s break down what RemoteIoT actually is. In simple terms, RemoteIoT is a protocol or framework that allows IoT devices to communicate over the internet securely. When you’re dealing with firewalls, this becomes even more crucial because you need a way to bypass those barriers without leaving your network vulnerable.
Think of RemoteIoT as a bridge. On one side, you’ve got your IoT devices, and on the other, you’ve got your Mac server. The bridge ensures that data flows smoothly between the two, even when there’s a firewall in the way. It’s not just about connecting; it’s about doing it safely.
Why Use RemoteIoT Behind a Firewall?
- Enhanced Security: Firewalls are great, but they can sometimes block legitimate traffic. RemoteIoT helps ensure that only authorized devices can connect.
- Scalability: Whether you’re managing a few devices or hundreds, RemoteIoT can scale with your needs.
- Flexibility: It works seamlessly with various platforms, including Mac servers, making it a versatile solution.
So, if you’re wondering why RemoteIoT is worth the effort, the answer lies in its ability to provide secure, scalable, and flexible connectivity. Now, let’s move on to the fun part – setting it up!
Setting Up a Mac Server for RemoteIoT
Alright, let’s get our hands dirty. The first step in using RemoteIoT behind a firewall is setting up your Mac server. Don’t worry if you’ve never done this before; we’ll break it down step by step.
Step 1: Installing macOS Server
First things first, you need to install the macOS Server app on your Mac. You can download it from the Mac App Store. Once installed, launch the app and follow the on-screen instructions to set up your server.
Step 2: Configuring Network Settings
Next, you’ll want to configure your network settings. This involves setting up static IP addresses for your server and ensuring that your firewall rules are configured correctly. You can do this by going to System Preferences > Network and adjusting the settings as needed.
Read also:Clix Haircut 2025 The Ultimate Guide To The Trendiest Hairstyles Of The Year
Pro Tip: Make sure your server is on the same network as your IoT devices. This will make the setup process much smoother.
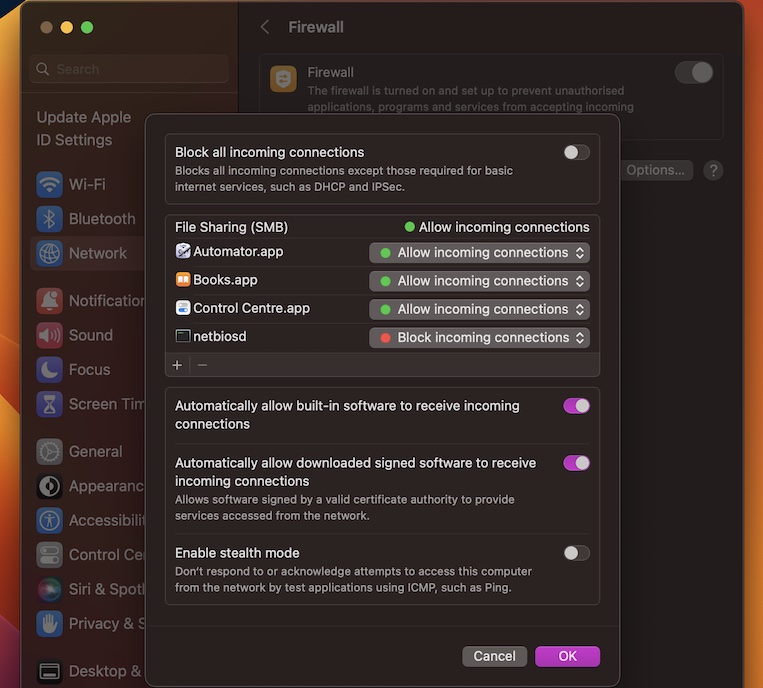
Configuring Firewall Rules for RemoteIoT
Now that your server is up and running, it’s time to tackle the firewall. Firewalls are designed to block unauthorized access, so you’ll need to configure specific rules to allow RemoteIoT traffic.
Step 1: Identifying Required Ports
RemoteIoT typically uses specific ports for communication. You’ll need to identify these ports and ensure they’re open on your firewall. Common ports include 80 (HTTP), 443 (HTTPS), and 22 (SSH). However, the exact ports may vary depending on your setup.
Step 2: Creating Firewall Rules
Once you’ve identified the required ports, you can create firewall rules to allow traffic on those ports. Most firewalls have a user-friendly interface that lets you add rules easily. Simply specify the source and destination IP addresses, select the appropriate ports, and you’re good to go.
Remember, security is key. While you want to allow RemoteIoT traffic, you also want to ensure that your network remains protected. Use strong passwords and consider implementing two-factor authentication for added security.
Connecting IoT Devices to the Mac Server
With your server and firewall set up, it’s time to connect your IoT devices. This step can vary depending on the devices you’re using, but the general process remains the same.
Step 1: Configuring Device Settings
Each IoT device will have its own settings that need to be configured. Typically, this involves entering the server’s IP address and specifying the communication protocol (e.g., HTTP, HTTPS, or MQTT).
Step 2: Testing the Connection
Once your devices are configured, it’s time to test the connection. You can do this by sending a simple command from your server to the device and checking if it responds. If everything is set up correctly, you should see a confirmation message.
Pro Tip: Use a tool like cURL or Postman to test your connections. These tools can help you identify and troubleshoot any issues that may arise.
Securing Your RemoteIoT Setup
Security should always be a top priority when setting up a remote IoT system. Here are a few tips to help you secure your setup:
- Use strong, unique passwords for all devices and accounts.
- Enable two-factor authentication wherever possible.
- Regularly update your software and firmware to protect against vulnerabilities.
- Monitor your network for suspicious activity and take action if anything seems off.
By following these best practices, you can ensure that your RemoteIoT setup remains secure and protected from potential threats.
Troubleshooting Common Issues
Even with the best planning, issues can arise. Here are some common problems you might encounter and how to fix them:
Problem 1: Devices Not Connecting
If your devices aren’t connecting, double-check your firewall rules and device settings. Make sure the required ports are open and that the IP addresses are correct.
Problem 2: Slow Connection Speeds
Slow connection speeds can be frustrating. To resolve this, consider upgrading your network hardware or optimizing your server settings. You might also want to check for any bottlenecks in your network.
Real-World Examples of RemoteIoT in Action
To give you a better idea of how RemoteIoT works in practice, let’s look at a couple of real-world examples:
Example 1: Home Automation
Imagine you’ve set up a smart home system with lights, thermostats, and security cameras. Using RemoteIoT, you can control all these devices from anywhere in the world, as long as you have an internet connection.
Example 2: Industrial IoT
In an industrial setting, RemoteIoT can be used to monitor and control machinery remotely. This is especially useful for businesses with multiple locations or those that need to manage equipment in remote areas.
Future Trends in RemoteIoT Technology
As technology continues to evolve, so does RemoteIoT. Here are a few trends to watch out for:
- Increased use of AI and machine learning to enhance connectivity and security.
- More focus on edge computing to reduce latency and improve performance.
- Greater integration with cloud platforms for scalable solutions.
These trends highlight the growing importance of RemoteIoT in the IoT landscape. By staying ahead of the curve, you can ensure that your systems remain cutting-edge and effective.
Conclusion and Next Steps
So, there you have it – a comprehensive guide to using RemoteIoT behind a firewall with a Mac server. From setting up your server to configuring firewall rules and connecting devices, we’ve covered everything you need to know. Remember, security is key, so always follow best practices to protect your network.
Now, it’s your turn to take action. Whether you’re setting up a home automation system or managing an industrial IoT setup, the skills you’ve learned here will serve you well. Don’t forget to share your experiences in the comments below and check out our other articles for more tips and tricks.
Thanks for reading, and happy connecting!
Table of Contents
- How to Use RemoteIoT Behind Firewall Using Mac Server Example
- Understanding RemoteIoT and Its Role in IoT Connectivity
- Why Use RemoteIoT Behind a Firewall?
- Setting Up a Mac Server for RemoteIoT
- Configuring Firewall Rules for RemoteIoT
- Connecting IoT Devices to the Mac Server
- Securing Your RemoteIoT Setup
- Troubleshooting Common Issues
- Real-World Examples of RemoteIoT in Action
- Future Trends in RemoteIoT Technology
- Conclusion and Next Steps