Hey there, tech lovers! If you're reading this, chances are you're already knee-deep in the world of Raspberry Pi and its limitless possibilities. But let's face it, not everyone knows how to harness the full power of Raspberry Pi VPC IoT projects. These projects aren’t just about tinkering with circuits; they’re about creating smart, scalable, and secure solutions that can transform how we live and work. Whether you're a hobbyist or a professional, this guide is here to show you the ropes and help you level up your game.
You might be wondering, "What exactly are Raspberry Pi VPC IoT projects?" Well, buckle up because we're diving deep into the world of tiny computers, virtual private clouds, and interconnected devices. Think of it as building a mini ecosystem where your gadgets talk to each other seamlessly, all powered by the mighty Raspberry Pi. And trust me, once you start, there's no going back!
Before we jump into the nitty-gritty, let’s establish one thing: this isn’t just another tech article. This is your ultimate guide to mastering Raspberry Pi VPC IoT projects, complete with real-world examples, expert tips, and actionable insights. Ready to get started? Let’s do this!
Read also:Hyungry Ep 3 The Ultimate Episode Unveiled
Table of Contents
- Introduction to Raspberry Pi VPC IoT Projects
- What is Raspberry Pi?
- Understanding Virtual Private Cloud (VPC)
- The Role of IoT in Modern Projects
- Setting Up Your Raspberry Pi for VPC IoT
- Top Raspberry Pi VPC IoT Projects
- Securing Your IoT Ecosystem
- Essential Tools for Success
- Pro Tips for Beginners
- The Future of Raspberry Pi VPC IoT
Introduction to Raspberry Pi VPC IoT Projects
So, you’ve heard the buzz about Raspberry Pi VPC IoT projects, but what does it all mean? Simply put, it's about combining the affordability and versatility of Raspberry Pi with the scalability and security of virtual private clouds (VPC) to create intelligent, interconnected systems. This combination allows you to build projects that range from home automation to industrial-grade solutions, all while keeping costs low and flexibility high.
One of the coolest things about Raspberry Pi VPC IoT projects is the sheer variety of applications. From setting up a smart thermostat that adjusts based on your schedule to creating an entire smart home system, the possibilities are endless. And the best part? You don’t need a Ph.D. in computer science to get started. With the right resources and a bit of curiosity, anyone can dive into this world and start building.
What is Raspberry Pi?
Raspberry Pi has been a game-changer in the tech world since its launch in 2012. It's essentially a small, single-board computer that packs a punch despite its size. With models ranging from the classic Raspberry Pi 3 to the latest Raspberry Pi 5, there's a version for every need and budget. But why is it so popular among makers and developers alike?
First off, Raspberry Pi is affordable, making it accessible to hobbyists, students, and professionals. Secondly, it's highly customizable, allowing you to tailor it to your specific project requirements. Whether you're building a weather station, a media server, or even a retro gaming console, Raspberry Pi has got you covered.
Why Choose Raspberry Pi for IoT Projects?
There are plenty of reasons why Raspberry Pi stands out for IoT projects:
- **Affordability**: You can get started with a budget-friendly device.
- **Community Support**: A massive online community means tons of tutorials and forums to help you troubleshoot.
- **Scalability**: From simple projects to complex systems, Raspberry Pi can grow with you.
- **Compatibility**: It works seamlessly with a wide range of sensors, actuators, and other IoT components.
Understanding Virtual Private Cloud (VPC)
Now let's talk about the VPC part of the equation. A Virtual Private Cloud is essentially a private network hosted within a public cloud environment. It provides a secure and isolated space where you can run your applications and store your data without worrying about unauthorized access. For Raspberry Pi VPC IoT projects, this setup is crucial for ensuring that your devices communicate securely and efficiently.
Read also:Rita Faez Onlyfans Rising Star In The Digital Age
Imagine having a fleet of IoT devices connected to your Raspberry Pi. Without a VPC, these devices could be vulnerable to cyberattacks or data breaches. By setting up a VPC, you create a protective layer that keeps your network safe while allowing your devices to interact seamlessly.
Benefits of Using VPC in IoT Projects
Here are some key benefits of integrating VPC into your Raspberry Pi IoT projects:
- **Enhanced Security**: Protect your devices and data from external threats.
- **Scalability**: Easily add more devices or expand your network as needed.
- **Cost Efficiency**: Leverage cloud resources without breaking the bank.
- **Flexibility**: Customize your VPC to fit your project's unique requirements.
The Role of IoT in Modern Projects
IoT, or the Internet of Things, is all about connecting everyday objects to the internet, enabling them to collect and exchange data. In the context of Raspberry Pi VPC IoT projects, IoT plays a pivotal role in creating smart ecosystems that enhance convenience, efficiency, and productivity.
For example, imagine a smart garden where sensors monitor soil moisture levels, temperature, and sunlight exposure. These sensors send data to your Raspberry Pi, which then adjusts watering schedules and lighting conditions automatically. This kind of automation not only saves time but also optimizes resource usage, making it a win-win for both you and the environment.
Setting Up Your Raspberry Pi for VPC IoT
Alright, let's talk about the practical side of things. Setting up your Raspberry Pi for VPC IoT projects involves a few key steps. First, you'll need to install the necessary software and configure your hardware. Don't worry if this sounds intimidating—we’ll break it down step by step.
Start by installing an operating system like Raspberry Pi OS. Then, connect your Raspberry Pi to your local network and configure it to communicate with your VPC. Depending on your project, you may also need to set up additional components like sensors, cameras, or other IoT devices.
Step-by-Step Guide
- **Install Raspberry Pi OS**: Download and flash the OS onto your SD card.
- **Connect to Wi-Fi**: Configure your network settings to ensure a stable connection.
- **Set Up VPC**: Use services like AWS or Google Cloud to create and configure your VPC.
- **Integrate IoT Devices**: Connect your sensors, cameras, and other components to your Raspberry Pi.
Top Raspberry Pi VPC IoT Projects
Now that you know the basics, let’s explore some exciting Raspberry Pi VPC IoT projects you can try:
1. Smart Home Automation
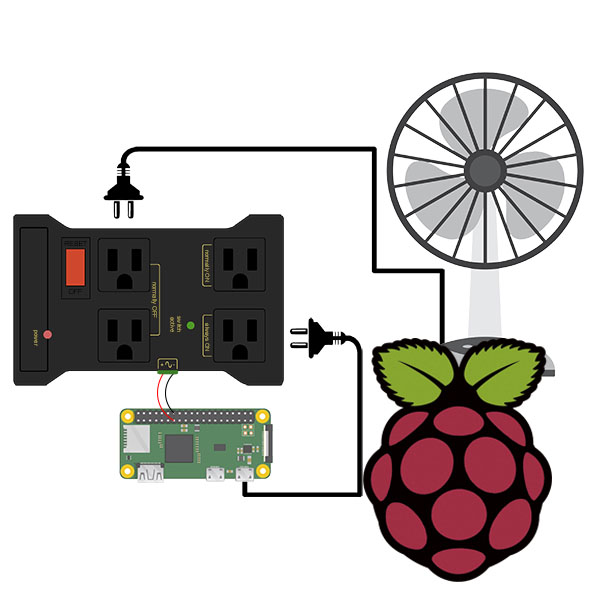
Create a centralized system to control lights, thermostats, and security cameras from your phone or voice assistant. With a VPC in place, you can ensure that your home network remains secure while enjoying seamless automation.
2. Weather Station
Build a weather station using sensors to measure temperature, humidity, and wind speed. Stream the data to your VPC and analyze it to make informed decisions about your environment.
3. Remote Surveillance System
Set up a network of cameras that stream live footage to your VPC. This project is perfect for monitoring remote locations or keeping an eye on your property while you're away.
Securing Your IoT Ecosystem
Security should always be a top priority when working on Raspberry Pi VPC IoT projects. With so many devices connected to the internet, the risk of cyberattacks increases exponentially. Here are some best practices to keep your ecosystem safe:
- **Use Strong Passwords**: Avoid using default credentials and opt for complex, unique passwords.
- **Enable Encryption**: Encrypt data transmissions to prevent unauthorized access.
- **Regular Updates**: Keep your software and firmware up to date to patch vulnerabilities.
- **Monitor Activity**: Set up alerts to notify you of any suspicious activity in your network.
Essential Tools for Success
Having the right tools can make or break your Raspberry Pi VPC IoT projects. Here are some must-haves:
- **Raspberry Pi Model**: Choose a model that fits your project’s requirements.
- **Sensors and Actuators**: Invest in high-quality components for accurate data collection.
- **VPC Provider**: Consider using AWS, Google Cloud, or Azure for your VPC needs.
- **Development Software**: Tools like Visual Studio Code or PyCharm can streamline your coding process.
Pro Tips for Beginners
If you're new to Raspberry Pi VPC IoT projects, here are a few tips to help you get started:
- **Start Small**: Begin with simple projects to build your confidence and skills.
- **Join Communities**: Engage with online forums and social media groups to learn from others.
- **Document Your Progress**: Keep a record of what works and what doesn’t to avoid repeating mistakes.
- **Experiment Freely**: Don’t be afraid to try new things and push the boundaries of your projects.
The Future of Raspberry Pi VPC IoT
As technology continues to evolve, the potential for Raspberry Pi VPC IoT projects is only going to grow. We’re already seeing advancements in AI integration, edge computing, and low-power devices that promise to revolutionize how we interact with our surroundings. Whether you're building a smart city or a personal assistant, the future is bright for those who embrace this exciting field.
So, what are you waiting for? Grab your Raspberry Pi, fire up your VPC, and start creating the IoT projects of tomorrow. Who knows, your next project might just change the world!
Kesimpulan
And there you have it, folks—a comprehensive guide to mastering Raspberry Pi VPC IoT projects. From understanding the basics to exploring advanced applications, we’ve covered everything you need to know to get started. Remember, the key to success lies in experimentation, learning, and staying updated with the latest trends.
Now it’s your turn to take action. Leave a comment below and share your favorite Raspberry Pi VPC IoT project ideas. Or better yet, try out one of the projects we discussed and let us know how it goes. Happy tinkering, and see you in the next article!