Imagine this—you’ve just set up your first IoT device, ready to take control of your smart home or monitor your remote sensors. But wait, how do you securely access it without breaking the bank? That’s where SSH comes in, folks. Accessing IoT devices via SSH for free is not only possible but also surprisingly easy if you know the tricks. So, buckle up because we’re diving deep into the world of IoT and SSH without spending a dime!
Now, I know what you’re thinking: "Isn’t SSH meant for big servers and tech wizards?" Not anymore! With the rise of IoT, even everyday users like you and me can leverage SSH to manage our smart gadgets. Whether you’re a hobbyist or a small business owner, understanding how to access IoT devices via SSH for free opens up a world of possibilities.
In this guide, we’ll break down everything you need to know about accessing IoT devices through SSH without any cost. From setting up your environment to troubleshooting common issues, we’ve got you covered. By the end of this, you’ll be rocking your IoT setup like a pro. Let’s get started!
Read also:Ariana Grandes Daughter How Old Is She And Everything You Need To Know
Table of Contents
- What is SSH and Why Does it Matter for IoT?
- Overview of IoT Devices and Their SSH Capabilities
- Free SSH Options for IoT Devices
- Setting Up SSH on Your IoT Device
- Securing Your SSH Connection
- Troubleshooting Common SSH Issues
- Tools and Software for SSH Access
- Advanced Tips for Managing IoT Devices via SSH
- Cost-Effective Solutions for Long-Term SSH Access
- Conclusion: Take Control of Your IoT Setup Today
What is SSH and Why Does it Matter for IoT?
SSH, or Secure Shell, is like the secret handshake of the tech world. It allows you to remotely access and control devices over a network—super useful when you’re dealing with IoT devices scattered all over the place. Think of it as your personal bridge to manage your smart devices without needing physical access.
For IoT enthusiasts, SSH is more than just a tool; it’s a lifeline. It provides secure communication, encryption, and authentication, ensuring that your data stays safe from prying eyes. Plus, it’s free to use on most platforms, making it an excellent choice for budget-conscious users.
Here’s why SSH matters for IoT:
- Encrypted communication keeps your data secure.
- Remote access means you can manage devices from anywhere.
- Cost-effective since most SSH clients are free.
- Easy to set up with the right guidance.
Overview of IoT Devices and Their SSH Capabilities
Understanding IoT Devices
IoT devices come in all shapes and sizes, from smart thermostats to industrial sensors. What they all have in common is their ability to connect to the internet and exchange data. Many of these devices support SSH out of the box, making it a breeze to manage them remotely.
Some popular IoT devices that support SSH include:
Read also:Clix Haircut 2025 The Ultimate Guide To The Trendiest Hairstyles Of The Year
- Raspberry Pi
- Arduino boards with Wi-Fi capabilities
- ESP8266 and ESP32 modules
- Smart home hubs like Samsung SmartThings
SSH Capabilities in IoT
When it comes to IoT, SSH offers a range of capabilities that make managing your devices a snap:
- File transfers using SCP or SFTP.
- Remote command execution for automation.
- Configuration updates without needing physical access.
- Monitoring and troubleshooting from afar.
With SSH, you can turn your IoT setup into a powerhouse of connectivity and control.
Free SSH Options for IoT Devices
Let’s face it—nobody wants to spend money on fancy software when there are plenty of free options available. Luckily, the world of SSH is full of open-source tools that won’t burn a hole in your pocket.
Here are some of the best free SSH options for IoT devices:
- OpenSSH: The gold standard for SSH clients and servers, OpenSSH is pre-installed on many Linux-based IoT devices.
- PuTTY: A lightweight and versatile SSH client for Windows users.
- Termius: A cross-platform SSH client that works on both desktop and mobile devices.
- MobaXterm: A powerful SSH client for Windows with additional features like file transfer and terminal emulation.
These tools are not only free but also packed with features that make managing your IoT devices a breeze.
Setting Up SSH on Your IoT Device
Step-by-Step Guide
Setting up SSH on your IoT device doesn’t have to be a headache. Follow these simple steps, and you’ll be up and running in no time:
Step 1: Enable SSH on Your Device
- Check your device’s documentation to see how to enable SSH.
- For Raspberry Pi users, simply enable SSH in the Raspberry Pi Configuration tool.
Step 2: Install an SSH Client
- Choose a client based on your operating system (Windows, macOS, Linux).
- Popular choices include PuTTY for Windows and Terminal for macOS/Linux.
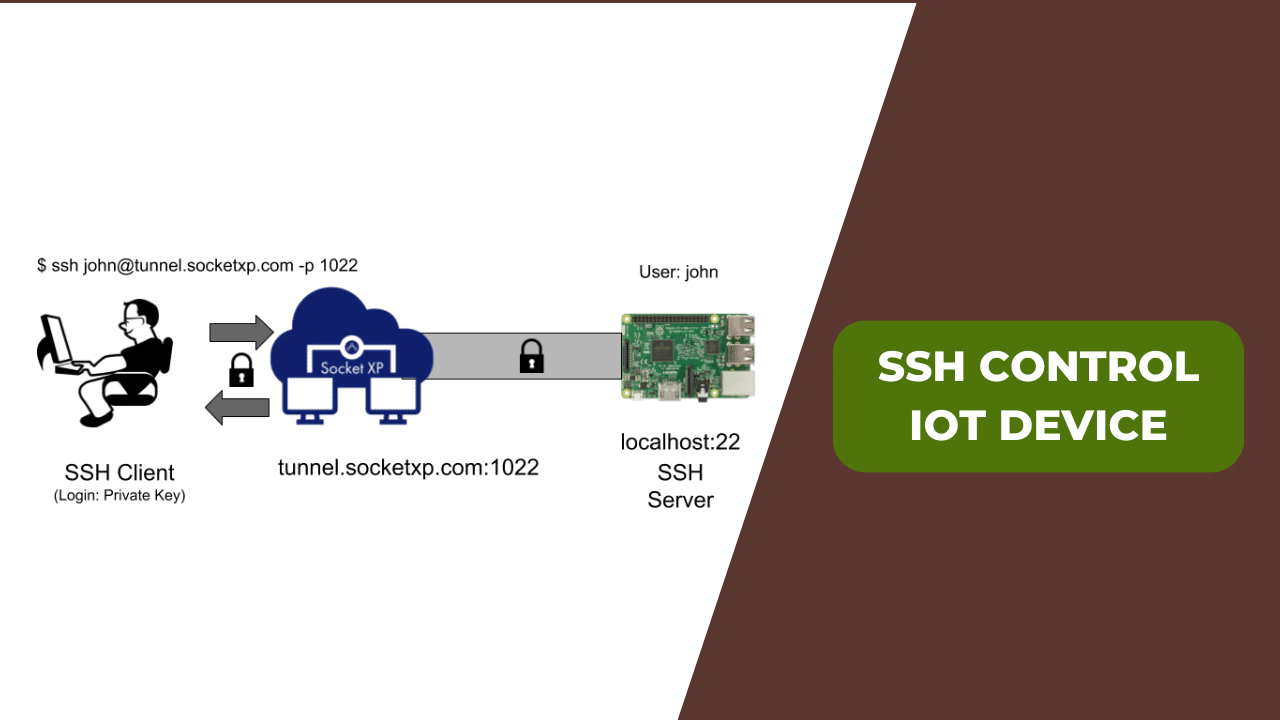
Step 3: Connect to Your Device
- Use the IP address of your IoT device to establish a connection.
- Enter your login credentials when prompted.
Tips for a Smooth Setup
Here are a few tips to ensure a smooth SSH setup:
- Make sure your device is connected to the same network as your computer.
- Double-check the IP address to avoid connection issues.
- Use strong passwords to enhance security.
Securing Your SSH Connection
Security should always be a top priority when working with IoT devices. SSH is inherently secure, but there are additional steps you can take to make your connection even safer.
Best Practices for SSH Security
- Use Strong Passwords: Avoid using common passwords or ones that are easy to guess.
- Enable Key-Based Authentication: This adds an extra layer of security by requiring a private key for access.
- Disable Root Login: Restrict direct access to the root user to prevent unauthorized access.
- Change the Default Port: Switching from the default port (22) can deter automated attacks.
By following these best practices, you can ensure that your SSH connections remain secure and your IoT devices are protected from potential threats.
Troubleshooting Common SSH Issues
Even the best-laid plans can go awry sometimes. If you’re having trouble with SSH, don’t panic! Here are some common issues and how to fix them:
Connection Refused
Solution: Check if SSH is enabled on your device and ensure that the IP address is correct.
Permission Denied
Solution: Verify your login credentials and make sure key-based authentication is properly set up.
Timeout Errors
Solution: Ensure that your device is on the same network and that there are no firewall rules blocking the connection.
Tools and Software for SSH Access
Beyond the basics, there are plenty of tools and software that can enhance your SSH experience:
Recommended Tools
- WinSCP: A free SFTP client for Windows that allows secure file transfers.
- TunnelBear: A VPN service that can help secure your SSH connections over public networks.
- SSHFS: Mount remote file systems over SSH for easy access.
These tools can take your SSH game to the next level, making it easier to manage your IoT devices.
Advanced Tips for Managing IoT Devices via SSH
Once you’ve mastered the basics, it’s time to level up your skills. Here are some advanced tips for managing IoT devices via SSH:
Automate Tasks with Scripts
Use SSH to run automated scripts that perform routine tasks, such as backups or system updates.
Monitor Device Performance
Set up monitoring tools to keep an eye on your device’s performance and receive alerts if anything goes wrong.
Centralize Management
Use SSH to manage multiple devices from a single point, streamlining your workflow and saving time.
Cost-Effective Solutions for Long-Term SSH Access
While SSH is free to use, there are ways to make your long-term setup even more cost-effective:
- Cloud-Based Solutions: Consider using free cloud services for remote SSH access.
- Open-Source Software: Stick with open-source tools to avoid licensing fees.
- Energy Efficiency: Choose energy-efficient IoT devices to reduce power consumption.
By implementing these cost-effective solutions, you can ensure that your SSH setup remains budget-friendly in the long run.
Conclusion: Take Control of Your IoT Setup Today
Accessing IoT devices via SSH for free is not only possible but also incredibly rewarding. From enabling remote management to enhancing security, SSH offers a wealth of benefits for IoT enthusiasts. By following the steps outlined in this guide, you can take full control of your IoT setup and unlock its full potential.
So, what are you waiting for? Dive into the world of SSH and start managing your IoT devices like a pro. And don’t forget to share your experiences in the comments below—we’d love to hear from you!
Call to Action: If you found this guide helpful, consider sharing it with your friends and following us for more tips and tricks on all things IoT!